Wednesday, June 13, 2012

DIY Coffee Sack Cork Board

Coffee Sack Cork Board

I made this cork board almost 2 years ago, but I did not actually finish it until last Thursday. The reason for my procrastination? I used staples that were too long and Mr. Mechanic would not let me hang it up in the kitchen with the staples sticking through the coffee sack.

So, for almost 2 years this sat propped up again the wall at the end of our hallway collecting Pumpkin’s dust bunnies behind it every week.

Instead of finishing it, I would just move it to vacuum and then put it right back in the same place for another week. Lazy Claire! Tisk Tisk!

On May 25th, I wrote this note to myself and put the cork board directly underneath it in the kitchen.

Note to Self

I had to look at it every time I walked into the house and it worked!

How long did it take me to finish it properly? Less than half an hour. Sheesh!

When I originally made this, coffee sacks and grain sacks were an up and coming trend. I don’t know if I’ve now missed that boat!

So, rewinding 2-ish years . . .

This started out as a clearance cork board from Winners. I loved the detail on the already distressed frame. With the right kind of wood frame this would be a great look to duplicate.

Bottom Corner Cork Board Watermark

Since I decided to take on this project in the middle of winter it was very difficult to find burlap with a tight weave. The only burlap I could find was for wrapping shrubs.

I was planning to stencil something onto the burlap but then I came across an actual burlap coffee sack at Princess Auto for $1.99. I remember coffee beans falling out of it when I opened it up!

I removed the paper backing from the frame and used side cutters to pull out the staples holding the cork in place.

Then, I trimmed the coffee sack to size and stapled it around the cork board, folding the corners like I was wrapping a present.

Cork Board Corner Stapled Watermark

From a distance it looked great, but if you decided to actually use it as a cork board you would risk needing a tetanus shot!

Fast forward approximately two years . . .

I gathered my tools again and the right staples – the shortest I could buy!

Bulletin Board Tools

See the staples in the blue bowl? That’s all I had to remove to fix this project!

I stapled beside the old staple and then pulled each one out with my side cutters. Mr. Mechanic swears by these and they are proving to be a very versatile tool.

Using 1/4 inch staples, I reattached the coffee sack to the bulletin board and then stapled the cork board to the frame to hold it in place.

Done!


Cork Board on Bench Watermark

It feels SO good to know that I have finished this project properly. It will serve as a reminder not to take shortcuts just to call something finished.

Coffee Sack Square

I still need to pick up a Command Hook so that I can hang this in the kitchen, but I have the perfect spot waiting for it. My goal? To have it on the wall by July!  Wendy from Three Chicks & One Egg knows what an accomplishment that will be!

Any guesses what my kitchen chalkboard used to be?  That’s one of my pre-blog upcycles that I’ve been meaning to share.

Thanks for including my blog in your busy day!

Pin It

P.S. Sadly, one of my favourite kitchen transformation projects is in my “fix me” pile. Humidity and repositionable spray adhesive do not get along! I’m definitely learning from my mistakes!


I link up at: Serenity Now, I {Heart} Naptime, Under The Table And Dreaming, NiftyThrifty Things, Simply Klassic Home, Home Stories A to Z, Craftomaniac, Skip To My Lou, Not JUST A Housewife, A Bowl Full Of Lemons, Alderberry Hill, I Should Be Mopping The Floor, A Diamond In The Stuff, Creatively Living, The Winthrop Chronicles, Clean & Scentsible, Oopsey Daisy, Lil’ Luna, Live.Laugh.Rowe, The 36th Avenue, aka design, House of Hepworths, 52 Mantels, Thrifty Decorating, Crafty Scrappy Happy, How To Nest For Less, Tatertots & Jello, The Grant Life, It’s Overflowing, Lolly Jane, Too Much Time, Six Sisters’ Stuff, Positively Splendid, My {Re}purposed Life, Just Us Four and The Crafted Sparrow

Thank you to all the hosts!


Monday, June 11, 2012

{Recipe}: Tuna Pasta Salad

Today, I thought I’d share a yummy recipe that even Mr. Mechanic will eat (he refuses to eat anything seafood related). It was passed onto us by Mr. M’s Mom and has been a favourite for years.

What I love most about this pasta salad is that the dressing only requires condiments that you’d already have for hamburgers and hotdogs.

I like simple recipes and this is definitely a great one for a hot day. This is usually my go-to recipe if I have to bring something to a summer potluck.

Tuna Pasta Salad Square

Here’s what you need:

Tuna Pasta Salad Ingredients

  • Pasta (I always use two boxes – it’s great for leftovers)
  • 2 cans of tuna
  • Celery and/or red pepper (for crunch)
  • Black pepper
  • Paprika (I’ve never added this but it is in the original recipe)
  • Green relish
  • Miracle Whip (we’ve tried Mayonnaise and it doesn’t have the same “zip”)
  • Mustard

The How To:

Chop your vegetables.

Drain the tuna.

Mix together in a large bowl.

Tuna Pasta Salad Mix It Together

Cook your pasta in salted water, drain and rinse with cold water.

Add your pasta to this mixture.

Toss with dressing.

To Make the Dressing (I triple this!)

Mix together . . .

  • 1/2 cup of Miracle Whip
  • 2 tablespoons relish
  • 1 tablespoon mustard
  • Pepper to taste

(Mr. Mechanic likes to also add a spoonful of dill pickle relish to his salad)

When we eat the leftovers we always add a bit more Miracle Whip.

This keeps well for several days in an airtight container (but it rarely lasts that long!)

Tuna Pasta Salad Finished

Do you have any great summer recipes?  I tried making my own Greek yogurt popsicles and it was a horrible flop!


Pin It

P.S. I’m looking forward to sitting on our patio with an Iced Cappuccino tomorrow! Have you tried one of these yet?


I link up at: Serenity Now, I {Heart} Naptime, Under The Table And Dreaming, NiftyThrifty Things, Simply Klassic Home, Home Stories A to Z, Craftomaniac, Skip To My Lou, Not JUST A Housewife, A Bowl Full Of Lemons, Alderberry Hill, I Should Be Mopping The Floor, A Diamond In The Stuff, Creatively Living, The Winthrop Chronicles, Clean & Scentsible, Oopsey Daisy, Lil’ Luna, Live.Laugh.Rowe, The 36th Avenue, aka design, House of Hepworths, 52 Mantels, Thrifty Decorating, Crafty Scrappy Happy, How To Nest For Less, Tatertots & Jello, The Grant Life, It’s Overflowing, Lolly Jane, Too Much Time, Six Sisters’ Stuff, Positively Splendid, My {Re}purposed Life, Just Us Four and The Crafted Sparrow

Thank you to all the hosts!


Friday, June 8, 2012

Washi Tape Pill Case Storage

Pill Case Banner

A long, long time ago I shared the craft closet in my office.

In that closet, I have a shoe organizer hanging on the door to hold my paper punches and other miscellaneous or frequently accessed supplies.

Craft Storage

If you look a little closer, you’ll see that I had everything for this project waiting for me in the pockets.

Labelled Storage

Technically, it’s not washi tape, but Canada is late to that party.

If you have access to washi tape 1. I’m very envious and 2. you can make this, too!

Anyway, last winter I bought a value pack of assorted scrapbooking embellishments from HomeSense and was pleasantly surprised to find that it had two packages of this fabric tape inside.

Fabric Tape 2

Many months later (I have good intentions!) . . .

I cut 7 pieces of tape, covered up each day of the week on the pill case and then filled each compartment up with my scrapbook brads. 

Brad Storage 1 WM

The tape was the exact same width as the raised rectangle so all I had to worry about was the length.

Pill Case Zoom WM

I love that I can still see what’s inside without opening the case.

Open Case Tilted WM

So easy!

Open Case 3 WM

Now all my brads are in one place, and there’s a spot freed up in my organizer for more fun craft supplies!

Open Pill Case WM

What on earth was I waiting for?

Do you ever finish a project and think “what took me so long?” Next week, I’ll be sharing my longest crafting procrastination EVER!

Happy Weekend!

Pin It

P.S. Want to know how I use brads? They’re not just for scrapbooking! Check out my paint chip balls!


I link up at: Serenity Now, I {Heart} Naptime, Under The Table And Dreaming, NiftyThrifty Things, Simply Klassic Home, Home Stories A to Z, Craftomaniac, Skip To My Lou, Not JUST A Housewife, A Bowl Full Of Lemons, Alderberry Hill, I Should Be Mopping The Floor, A Diamond In The Stuff, Creatively Living, The Winthrop Chronicles, Clean & Scentsible, Oopsey Daisy, Lil’ Luna, Live.Laugh.Rowe, The 36th Avenue, aka design, House of Hepworths, 52 Mantels, Thrifty Decorating, Crafty Scrappy Happy, How To Nest For Less, Tatertots & Jello, The Grant Life, It’s Overflowing, Lolly Jane, Too Much Time, Six Sisters’ Stuff, Positively Splendid, My {Re}purposed Life and The Crafted Sparrow

Thank you to all the hosts!


Wednesday, June 6, 2012

Neon Necklace From Repurposed Dollar Store Jewelry

Neon Necklace Banner Square WM

Okay, so this isn’t your circa 1980s neon, but it’s definitely not a pastel necklace!  For a fair-skinned gal like me, it’s just bright enough to make a statement.

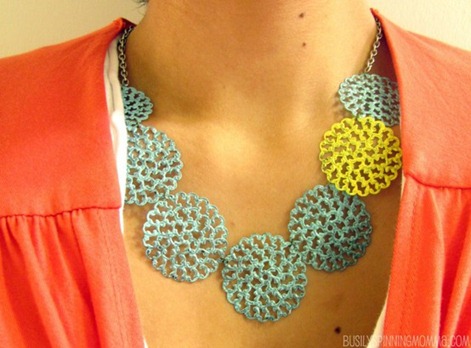
I have been on the hunt for an inexpensive way to make my own version of these two filigree jewelry pieces that I found on Pinterest and The Crafted Sparrow (please click each image to be taken to their tutorial or to pin these projects).

Busily Spinning Momma Painted Filigree NecklaceThe Crafted Sparrow Patinaed Filigree Earrings

While I was in the Dollar Store, I quickly checked the jewelry and found just what I needed! For fellow Canadians, I am a frequent Dollarama customer, but this great find came from the Everything For A Dollar Store chain.

Neon Earrings Collage With Text

Once I had paraded the earrings around my backyard (thank you, Rebecca from The Crafted Sparrow for inspiring me to hang them on a branch of my Weigela), I was ready to repurpose.

I gathered my supplies . . .

Neon Jewelry Supplies

(Pay no attention to the pink earring that was being uncooperative!)

Then, I removed the earring hook, keeping the existing jump ring and attached the three medallions together. In the end, I only needed one extra jump ring.

I tried to attach the three medallions together in an arrangement that would make them fall more in a U shape than a straight line.

3 Medallions Zoom WM

Finally, I attached the medallions to my chain, cutting off the unnecessary length from the middle so that it could be reused.

The chain was originally for an 18 inch necklace and I wanted it to sit on my collarbone so I shortened it to about 16 inches. You can view a handy reference for necklace lengths here.

That’s it!

My biggest challenge was the dark, dreary day and having to take indoor photos.


Neon Necklace After 1 WM

 After the sun came out, I returned to my garden and took this fun shot! 


Neon Necklace Hosta WM

I was wearing my newest necklace all weekend and love the pop of colour that it adds to my wardrobe. It will make a great summer necklace!

Neon Necklace Collage

On the same trip, I found another fun pair of earrings (that I would never, ever wear as earrings). I’m still trying to figure out how to repurpose them . . .

Dollar Store Jewelry Honeycomb Preview

Any suggestions?


Pin It


P.S. If you’re not lucky enough to find jewelry in a colour that is wearable, here is a quick way to fix that! (I bet nail polish would be fun, too!)
 

I link up at: Serenity Now, I {Heart} Naptime, Under The Table And Dreaming, NiftyThrifty Things, Simply Klassic Home, Home Stories A to Z, Craftomaniac, Skip To My Lou, Not JUST A Housewife, A Bowl Full Of Lemons, Alderberry Hill, I Should Be Mopping The Floor, A Diamond In The Stuff, Creatively Living, The Winthrop Chronicles, Clean & Scentsible, Oopsey Daisy, Lil’ Luna, Live.Laugh.Rowe, The 36th Avenue, aka design, House of Hepworths, 52 Mantels, Thrifty Decorating, Crafty Scrappy Happy, How To Nest For Less, Tatertots & Jello, The Grant Life, It’s Overflowing, Lolly Jane, Too Much Time, Six Sisters’ Stuff, Positively Splendid, 413 Sparrow Lane, My {Re}Purposed Life, Just Us Four and The Crafted Sparrow

Thank you to all the hosts!


Sunday, June 3, 2012

Don’t Leave Your Dishwasher Unattended

One week ago, I woke up to probably the scariest thing that has ever happened to me.

After going to bed just after midnight, I woke up at 1:07 A.M. to the smell of something burning.

Fire has always been my biggest fear. I have never lit a match or used a cigarette lighter in my life. Seriously.

My city recently switched to time-of-use rates for hydro and everyone is encouraged to do laundry, run their dishwasher etc. after 7 P.M. or on the weekends.

I had not accomplished as much as I wanted to on Sunday evening so when I went to bed the dishwasher was running as well as the washer and the dryer. I was hesitant to run the dryer but I didn’t want the clothes to smell musty.

I always start the dishwasher when I go to bed. It’s part of my routine.

Never again.

Here’s why:

Dishwasher

Our bread knife (which had been used to cut a tomato so, in my opinion, it needed to be washed) fell from the top rack and landed on the heating element during the wash cycle.

Dishwasher 2

Once it got to the dry cycle, it proceeded to melt and burn on the heating element.

After waking Mr. Mechanic from a dead sleep, I turned on the light to find that the whole hallway was smoky and smelled like burning plastic crossed with birthday candles.

We didn’t see any flames or feel heat so we started to look for the source, and our cat. She was sleeping on a chair in the basement. Completely oblivious. I took this as a good sign.

When I went back upstairs to the kitchen I noticed there was smoke, not steam, coming out of the dishwasher vent.

At this point, I started to shake and hyperventilate. It was a night hot enough to have the air conditioning on yet I was shivering uncontrollably while wearing a robe.

Conversely, Mr. Mechanic jumped into action. He turned off the breakers for the kitchen and then opened the dishwasher (the last thing that I would have done).

Smoke came pouring out of the dishwasher but there were no flames.

He found the knife and carried it outside with tongs.

Dishwasher 3

Crisis averted, we were safe again.

Our house smelled like something toxic, but we were safe.

Then, as I came down from the adrenaline rush, I started thinking all these questions.

Why didn’t the smoke detector go off?

. . . because it was sitting on the counter covered up by my lunch bag after taking it down to avoid it screeching at me when I drain pasta.

What would have happened if I hadn’t woken up?

. . . Mr. Mechanic doesn’t think it could have turned into a fire but given the quirks of our house and the issue of our dishwasher being directly above the breaker panel, I think he was just trying to make me feel better.

Was our house and our lives worth the money I saved on hydro?

. . . Absolutely not.

Didn’t I read about this happening to two different families on Young House Love?

. . . Yes. 

We were so lucky. Things could have turned out very differently.

Please.

Learn something from me.

Check your smoke detectors.

Change your batteries.

Make an escape plan.

And read this if you still need it to really hit home.


Don’t leave your dishwasher unattended.


I link up at: Serenity Now, I {Heart} Naptime, Under The Table And Dreaming, Nifty Thrifty Things, Simply Klassic Home, Home Stories A to Z, Craftomaniac, Skip To My Lou, Not JUST A Housewife, A Bowl Full Of Lemons, Alderberry Hill, I Should Be Mopping The Floor, A Diamond In The Stuff, Creatively Living, The Winthrop Chronicles, Clean & Scentsible, Oopsey Daisy, Lil’ Luna, Live.Laugh.Rowe, The 36th Avenue, aka design, House of Hepworths, 52 Mantels, Thrifty Decorating, Crafty Scrappy Happy, How To Nest For Less, Tatertots & Jello, The Grant Life, It’s Overflowing, Lolly Jane, Too Much Time, Six Sisters’ Stuff, Positively Splendid and The Crafted Sparrow

Thank you to all the hosts!


Friday, June 1, 2012

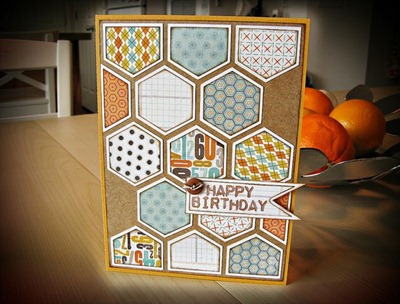
I Love Hexagons! {Masculine Birthday Card}

Masculine Birthday Card WM

After several days of creating my Dad’s birthday gift, I was finally able to deliver it to him yesterday. He thought that I had bought it!

Dad and Claire Birthday Edit

The sign has a back story and I want to make sure I get my facts straight so, I will share the details on how I made a piece of pine look like the side of a Harvard airplane after the weekend.

I always have fun making the card to accompany the gift but this year I had the extra pressure of knowing that this was my first post-Silhouette handmade birthday card for my Dad! I think he might still have last year’s card sitting on his bedside table.

Once I found my inspiration pinspiration, this card came together very quickly.

Flickr Image Hexagons

Source: jennecy via Claire on Pinterest

Not only did I love the hexagons, I already owned the paper pack that she used {My Mind’s Eye: Fine & Dandy}.

I have the 6 x 6 scrapbook pad and actually hesitated when it came to buying it last year at Winners. I put it back several times and finally bought it when I went back at a later date and found that it was still there. It was meant to be!

After cutting out the hexagons (reminder: double-side paper = more bang for your buck and easy colour coordinating) and the pennant with my Silhouette, I decided it was finally time to try out a new tool for inking the edges of each shape (I probably bought it 2 or 3 months ago).

Inkssentials Ink Blending Tool

To use it, I stamped my Tim Holtz Distress Ink in Vintage Photo onto a sheet of freezer paper and then transferred it to the edges of my shapes with the blending tool.

The blender creates a much softer inked effect in comparison to rubbing the edge of an ink pad directly onto your paper. It is so much quicker, too!

After arranging my hexagons and stamping my sentiment (total fluke that it stamped right on the line!), I attached all of the pieces with foam dots to add even more dimension.

I love the retro colour scheme and all of the fun patterns!

Dad Birthday Card 1 WM


Dad Birthday Card Tilted 2 WM


Dad Birthday Card Square WM


Dad Birthday Card BEV WM

Hmm . . . maybe that’s because it’s a lot like my blog’s colour scheme?

Dad’s birthday = crafting success!

Next up, Father’s Day!

Want some ideas? I have started a Father’s Day board on Pinterest to keep track of some of the great handmade ideas I come across.

I hope you have a great weekend!

Pin It

P.S. This paper also made an appearance in my Sister-in-Law’s adorable Nursery Artwork!


I link up at: Serenity Now, I {Heart} Naptime, Under The Table And Dreaming, Nifty Thrifty Things, Simply Klassic Home, Home Stories A to Z, Craftomaniac, Skip To My Lou, Not JUST A Housewife, A Bowl Full Of Lemons, Alderberry Hill, I Should Be Mopping The Floor, A Diamond In The Stuff, Creatively Living, The Winthrop Chronicles, Clean & Scentsible, Oopsey Daisy, Lil’ Luna, Live.Laugh.Rowe, The 36th Avenue, aka design, House of Hepworths, 52 Mantels, Thrifty Decorating, Crafty Scrappy Happy, How To Nest For Less, Tatertots & Jello, The Grant Life, It’s Overflowing, Lolly Jane, Too Much Time, Six Sisters’ Stuff, Positively Splendid and The Crafted Sparrow

Thank you to all the hosts!


Related Posts Plugin for WordPress, Blogger...