Showing posts with label Cards. Show all posts

Friday, January 4, 2013

2013 - aka Where’s Claire?

Hello and Happy 2013! 

It’s been a while. 

(Ha! That’s an understatement)

If you’re still reading my blog . . . thank you, thank you, thank you!

I came so close to writing 100 posts and then something happened.

Something good.

Way back in October we went to the cottage to close it up for the winter. While we are at the cottage my only contact with home is a bottom-of-the-line cell phone with limited reception and internet access. I refuse to have a cell phone contract.

On a whim, I checked my email and found that a Kindergarten teacher had been trying to get hold of me for two days. Via text messages, I landed myself a supply teaching job indefinitely. The following Tuesday I started teaching a Full-Day Kindergarten class with a fabulous Early Childhood Educator.

28 little bodies in one room.

But, in the meantime, my cousin’s wife, Laura, who teaches at the same school went on an early maternity leave. They had not interviewed anyone for her position at this point because she expected to teach until the end of October. However, the twins she was carrying had other plans!

I interviewed for her position (Grade 3/4) and heard nothing for a few days. Then, the day before Halloween the Principal approached me to tell me I had been recommended for the position and would switch over on November 1st.  Eeek!

So, after surviving Halloween in Kindergarten, I made my way down the hall to drop off my things in the classroom where I will be teaching until the end of the school year.

Two months later, I am still trying to strike a balance between teaching and “in the meantime.”

Grade 3 and 4 are completely out of my comfort zone. I have been teaching for almost 7 years but all of my previous long-term positions have been in Kindergarten and Grade 1. I am not used to a curriculum that I have to teach myself before I can teach the class!  And the split. I have huge respect for teachers of split grade classes. Oh, and I have to teach French since I have 6 Grade 4’s in my class. I haven’t taken French since University.

November felt more like September as everyone got settled into new routines and December was a blur with holiday activities taking up more time than I could afford.

I have to remind myself to take everything one day at a time.

As overwhelmed as I feel at times, it is such a honour that my administrators saw my potential and chose me for the job.

I hope January can be a fresh start for everyone.

No matter what, this new teaching adventure would not be possible if it were not for these little ladies:

February 2013 050February 2013 051


Zoe and Lyla, born on December 28th, 2012


Of course, I had to use my Silhouette to make a special card welcoming them to the world!

A Little Something in the Meantime - Baby Card for Twins Using Silhouette Cameo

Handmade cards are one thing I can always make time for . . . unless you count Christmas cards. Sorry, they didn’t happen this year!

For the first few days it was Lyla and “Baby B” so I had to wait until a second name was picked before I could send it on its way. 

As an added bonus, I got to take photos of my card with my new DSLR camera! No editing, just cropping. Love it!

Proud parents Laura and Adam now have 4 little girls – Claudia, Annabelle, Lyla and Zoe. I cannot even imagine!  Oh, and they’re all under 4 years old!

A Little Something in the Meantime - Baby Card for Twins Using Silhouette Cameo

So, that’s where I’ve been. How about you? I hope things are well in your neck of the woods!

Please know that even if I’m not commenting on your posts, I’m still reading your blog in my downtime. I don’t think I could give that up!

Have a great day/week/month! (let’s be realistic – it’s report card writing time)

Pin It

Sunday, June 17, 2012

{Carved} Woodgrain Father’s Day Card

Carved Woodgrain Banner

After much searching, I finally bought a woodgrain rubber stamp off of Etsy (BTW, amazing seller – shipped within hours of my purchase) and I absolutely LOVE it!  Just one stamp completely transforms Kraft-coloured cardstock.

I decided that I wanted to make my first woodgrain card look like a carved tree trunk. After searching for images of trees with limited success, I suddenly realized that I could use my Silhouette CAMEO and sketch pens to “carve” my image onto a a pre-stamped piece of cardstock.

I bought the upgraded Silhouette Designer Edition back when there was a really great promo code after learning that I would have more sketch options with this version. It definitely came in handy for this card.

After designing my heart and adding the text (Ostrich Sans Rounded – a great sketch pen font), it looked like this:

Father's Day Before

Pretty plain, but a good starting point.

After experimenting with the different edge sketch options I settled on “pencil” for the text and “charcoal” for the heart outline.

Father's Day After

Much better!

I loaded a black ball-point pen into my pen holder and sent it to sketch on a piece of Kraft paper that was already stamped with woodgrain in approximately the same spot.

If you don’t have a Silhouette, you could achieve the same effect by using a ball-point pen to repeatedly draw the same design. The harder you press, the more carved it looks on the paper.

Then, I took a blank card base (also Kraft paper) and stamped the woodgrain onto both halves. I thought that if I mounted the sketched image onto another layer of woodgrain it might look more like a tree trunk.

Father's Day Card Materials

I tried another  trick when I stamped the card base. I put a thin piece of masking tape in the spot where I always add “Claire Cards” to my handmade cards so that it would not stamp in this spot.

I also inked the edges of the card base and the message to add more depth. This time I used my blending tool and Tim Holtz’ Distress Ink in Walnut Stain. Vintage Photo has some competition!

Stamped Cards

Then, I added some dollar store foam mounting squares . . .

Add Foam Rectangles

and assembled my card.

Mounted Card

It’s hard to see, but in the bottom right-hand corner you will notice that the two layers of stamped woodgrain work together to look more 3-dimensional.

Here’s a close-up of the “carved” detail.

Carved Sentiment

Neat, right?

Off we go on the mandatory garden tour – you will come to know this brick wall and 4 by 4 very well over the summer!

Finished Woodgrain Card


Father's Day Card in Cypress


Woodgrain Father's Day Card

Wouldn’t this make a fun wedding or anniversary card?  I guarantee you’ll be seeing more woodgrain cards in the future!

Carved Banner Square

Since I have to be away for Father’s Day (for the first time ever!), here’s a special message for you, Dad, to tide you over until next weekend. Love you! XOXOXO

Father's Day 2012 Message

Pin It


I link up at: Serenity Now, I {Heart} Naptime, Under The Table And Dreaming, NiftyThrifty Things, Simply Klassic Home, Home Stories A to Z, Craftomaniac, Skip To My Lou, Not JUST A Housewife, A Bowl Full Of Lemons, Alderberry Hill, I Should Be Mopping The Floor, A Diamond In The Stuff, Creatively Living, The Winthrop Chronicles, Clean & Scentsible, Oopsey Daisy, Lil’ Luna, Live.Laugh.Rowe, The 36th Avenue, aka design, House of Hepworths, 52 Mantels, Thrifty Decorating, Crafty Scrappy Happy, How To Nest For Less, Tatertots & Jello, The Grant Life, It’s Overflowing, Lolly Jane, Too Much Time, Six Sisters’ Stuff, Positively Splendid, My {Re}purposed Life, Just Us Four and The Crafted Sparrow

Thank you to all the hosts!


Friday, June 1, 2012

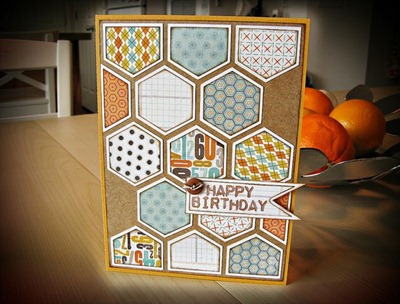
I Love Hexagons! {Masculine Birthday Card}

Masculine Birthday Card WM

After several days of creating my Dad’s birthday gift, I was finally able to deliver it to him yesterday. He thought that I had bought it!

Dad and Claire Birthday Edit

The sign has a back story and I want to make sure I get my facts straight so, I will share the details on how I made a piece of pine look like the side of a Harvard airplane after the weekend.

I always have fun making the card to accompany the gift but this year I had the extra pressure of knowing that this was my first post-Silhouette handmade birthday card for my Dad! I think he might still have last year’s card sitting on his bedside table.

Once I found my inspiration pinspiration, this card came together very quickly.

Flickr Image Hexagons

Source: jennecy via Claire on Pinterest

Not only did I love the hexagons, I already owned the paper pack that she used {My Mind’s Eye: Fine & Dandy}.

I have the 6 x 6 scrapbook pad and actually hesitated when it came to buying it last year at Winners. I put it back several times and finally bought it when I went back at a later date and found that it was still there. It was meant to be!

After cutting out the hexagons (reminder: double-side paper = more bang for your buck and easy colour coordinating) and the pennant with my Silhouette, I decided it was finally time to try out a new tool for inking the edges of each shape (I probably bought it 2 or 3 months ago).

Inkssentials Ink Blending Tool

To use it, I stamped my Tim Holtz Distress Ink in Vintage Photo onto a sheet of freezer paper and then transferred it to the edges of my shapes with the blending tool.

The blender creates a much softer inked effect in comparison to rubbing the edge of an ink pad directly onto your paper. It is so much quicker, too!

After arranging my hexagons and stamping my sentiment (total fluke that it stamped right on the line!), I attached all of the pieces with foam dots to add even more dimension.

I love the retro colour scheme and all of the fun patterns!

Dad Birthday Card 1 WM


Dad Birthday Card Tilted 2 WM


Dad Birthday Card Square WM


Dad Birthday Card BEV WM

Hmm . . . maybe that’s because it’s a lot like my blog’s colour scheme?

Dad’s birthday = crafting success!

Next up, Father’s Day!

Want some ideas? I have started a Father’s Day board on Pinterest to keep track of some of the great handmade ideas I come across.

I hope you have a great weekend!

Pin It

P.S. This paper also made an appearance in my Sister-in-Law’s adorable Nursery Artwork!


I link up at: Serenity Now, I {Heart} Naptime, Under The Table And Dreaming, Nifty Thrifty Things, Simply Klassic Home, Home Stories A to Z, Craftomaniac, Skip To My Lou, Not JUST A Housewife, A Bowl Full Of Lemons, Alderberry Hill, I Should Be Mopping The Floor, A Diamond In The Stuff, Creatively Living, The Winthrop Chronicles, Clean & Scentsible, Oopsey Daisy, Lil’ Luna, Live.Laugh.Rowe, The 36th Avenue, aka design, House of Hepworths, 52 Mantels, Thrifty Decorating, Crafty Scrappy Happy, How To Nest For Less, Tatertots & Jello, The Grant Life, It’s Overflowing, Lolly Jane, Too Much Time, Six Sisters’ Stuff, Positively Splendid and The Crafted Sparrow

Thank you to all the hosts!


Thursday, May 17, 2012

Mother’s Day {or any other occasion} Card

You’ve seen the gifts (click for more details)

Etched Cup Flowers 1 WM

and the recipient, now here’s the final piece – my Mother’s Day card.

Mother's Day Card embellished with flowers and buttons from A Little Something In The Meantime

I had a lot of fun creating this card because it incorporated one of my crafting favourites . . . buttons!

I have SO many buttons in all different colours, but I don’t think that I have ever actually used them on a card.

If I haven’t said it already, double-sided scrapbook paper is a great investment. The colours and patterns already co-ordinate which makes it simple to embellish cards with multiple papers.

For this card design, I chose several double-sided papers from the same pack and cut out a variety of flower shapes and sizes with my Silhouette.

Pieces 1

As usual, I cut lots of extra pieces so that I will be able to make this card again. They now have their own storage case.

Since I’m a perfectionist, I find the initial card takes a really long time to design, but, once I have the pieces, it is always quick and easy to make duplicates.

I also used my white sketch pen to add “Happy Mother’s Day” to the Kraft paper pennant. I have several of these pre-cut with congratulations and birthday sentiments.

Mother's Day Card Pieces WM

To assemble the card, I rounded the bottom corners of the background paper and mounted it on a card base cut from Kraft paper as well.

Some of the flowers have a foam square behind them to add some dimension. Other than that, everything (including the buttons) was attached to the card using my newest tool – a Xyron tape runner.

I bought a kit containing three different Xyron adhesives and refills for $12.99 at HomeSense. I can’t wait to use the sticker maker!

Mother's Day Crop Horizontal

Mother's Day 2 WM

Mother's Day Angled WM

(Gee, can you tell my Mom loves flowers?)

I had a wonderful time creating these handmade gifts for my Mom. Now I need to focus my energy on creating something for my Dad’s birthday (May 30th) AND Father’s Day. He’s always a challenge! I think I’ll be getting some help from Pinterest!

I don’t know about you, but I’m looking forward to the long weekend!

Thanks for stopping by!

Pin It

P.S. My Mother-in-Law is an avid gardener, too! Check out the card I made for her this year here.

Linking up here as well as to these great parties!

Thank you to all the hosts!

Home Stories A2ZWeekend Bloggy Reading
Related Posts Plugin for WordPress, Blogger...