Tuesday, September 18, 2012

Saying Goodbye/Beverage Tub Makeover

Today, blogs and blogging provided me with a much needed diversion on a hard day for my family.

We had to say goodbye to this little lady.

Maggie

Maggie turned 13 in August but had a rapid decline in her health starting around March of this year.

Prior to this Maggie was a cat who stayed kitten-sized and acted like one as well.

She always had a daredevil streak to her which may have stemmed from the fact that when we adopted her as a kitten from the Humane Society she had already fallen from a 14th floor balcony into a snow bank. She loved to be up high and would spend her time watching you from the top of the kitchen cupboards or her scratching post tower.

Even though I no longer live at home, I still think of Maggie and Buddy (my parents’ other cat) as my pets because I was there with them from the beginning. I will always remember Maggie being so small that her entire body would vibrate when she purred.

I have never met another cat like her and I’m sure I never will.

When I had my final visit with Maggie on Sunday night, I knew my parents had made the right decision and that her time had come. I’m relieved that she is no longer suffering, but it doesn’t make it hurt any less.

To quote my Mom, “Maggie had a happy life and a peaceful end, and we will love her forever.”

We miss you, Maggie!


Now for what I had originally planned to share before life threw me a curveball . . .

Throughout the summer I kept tabs on the price of this metal beverage tub from Lowe’s knowing that I could use it for . . . something. The outside looks like white enamel and the inside is galvanized metal.

Laundry Bucket Before WM

When it finally reached a clearance price of around $7, I pounced after striking a deal with Mr. Mechanic that I would clean up the Laundry Room if we bought it.

The Laundry Room is still a disaster (shh!) but my tub looks adorable thanks to a quick and easy vinyl makeover.

Laundry Bucket Symbols Zoom

I learned from this post that there is a free font {SL Wash} made up completely of laundry symbols.

You can download SL Wash here or by clicking on the image below.

Character Set For SL Wash

I typed the letters that corresponded with wash, dry and iron in Silhouette Studio and resized them until they were all the same height.  Then I cut them out of black vinyl with my Silhouette.

Finally, I used a combination of transfer and painter’s tape to place the symbols on my tub.

I’m not going to lie, it was a pain in the butt to try to align them on a curved surface, but it was worth the aggravation in the end!

Wouldn’t you agree?

Laundry Bucket After WM

While the rest of the Laundry Room is still nothing worth sharing thanks to an on-going basement renovation, my kitchen towels and rags have a cute place to hang out until I accumulate enough to justify a load of laundry.

Thanks for sticking with me today!

Pin It

P.S.  Don’t even ask about that chair. It’s a DIY Chalk Paint experiment that went terribly wrong. I’m starting to realize that painting furniture is not my thing.

P.P.S. If you like fonts you should check out my board on Pinterest for some great suggestions!


I link up at:
Serenity Now, I {Heart} Naptime, Under The Table And Dreaming, Nifty Thrifty Things, Simply Klassic Home, Home Stories A to Z, Craftomaniac, Skip To My Lou, Not JUST A Housewife, A Bowl Full Of Lemons, Alderberry Hill, I Should Be Mopping The Floor, A Diamond In The Stuff, Creatively Living, The Winthrop Chronicles, Clean & Scentsible, Oopsey Daisy, Lil’ Luna, Someday Crafts, Live.Laugh.Rowe, The 36th Avenue, aka design, House of Hepworths, 52 Mantels, Thrifty Decorating, Crafty Scrappy Happy, How To Nest For Less, Tatertots & Jello, The Grant Life, It’s Overflowing, Lolly Jane, Too Much Time, Six Sisters’ Stuff, Positively Splendid, My {Re}purposed Life, Unrefined By Design, Just Us Four, Liz Marie Blog and The Crafted Sparrow

Thursday, September 13, 2012

Golden Wedding Anniversary Sign

Last month my parents received an invitation for a 50th wedding anniversary celebration.

The invitation specified: no gifts, just well wishes. Being crafty, I suggested that I make a family name sign to commemorate the occasion knowing that the materials would cost about the same as a card.

Here is what I came up with:

Dixon Family Name Sign Zoom

The lettering is done in gold (my Mom’s great idea – apple doesn’t fall far from the tree) and provides the perfect contrast against the black paint.

Gold Stencil Zoom

I started with a pine board from Home Depot that I cut to size.

I painted the board (the second time . . . keep reading) with two layers of white (in case I decided to distress it later on) and then two layers of black Martha Stewart acrylic paint (my favourite brand for coverage and quality).

I designed the sign and then cut a contact paper stencil using my Silhouette.

I added a box around my text so that the cut stencil matched the dimensions of my pine board to make the spacing and alignment easier.

I used my new Scotch Blue Delicate Surfaces tape to transfer the stencil to my board. So easy and inexpensive compared to transfer tape!

Contact Paper Stencil

Using a Martha Stewart stencil brush I pounced on gold acrylic paint and learned that it is important to read the drying instructions when you are using metallic paint! It said to wait 1 hour between coats.

I first tried this with a different brand and stencilled too much too soon. It peeled off in pieces (like gold leaf, I assume) when I removed the contact paper. I had to start all over again.

Lesson learned!

I touched up the gold paint that bled under the stencil with a fine-tipped brush. I used the positive space of the stencil to cover the necessary letters and numbers and then painted around the edges.

After showing a photo of the painted and stencilled board to my parents via email, my Dad suggested that I add something to the corners. I searched the Silhouette store and couldn’t find anything I liked so I went with the next best thing, stripes!

I used this trick from KariAnne of Thistlewood Farm (see step #4) to create easy no-measure stripes using pin striping painter’s tape (since we already established that I don’t like to measure stripes here) and then stencilled them with one coat of gold paint.

I left the top and bottom edges of the board black but painted the sides with gold to make the gold of the stripes wrap around the board.

Dixon Sign Rocking Chair Vertical

Isn’t this a great personalized gift for a milestone anniversary?  Silver, gold, platinum . . .

Dixon Sign Mantel Orton WM


Pin It

P.S. You can see the rest of my front porch here.  I’m looking forward to switching it up for fall!


I link up at:
Serenity Now, I {Heart} Naptime, Under The Table And Dreaming, Nifty Thrifty Things, Simply Klassic Home, Home Stories A to Z, Craftomaniac, Skip To My Lou, Not JUST A Housewife, A Bowl Full Of Lemons, Alderberry Hill, I Should Be Mopping The Floor, A Diamond In The Stuff, Creatively Living, The Winthrop Chronicles, Clean & Scentsible, Oopsey Daisy, Lil’ Luna, Someday Crafts, Live.Laugh.Rowe, The 36th Avenue, aka design, House of Hepworths, 52 Mantels, Thrifty Decorating, Crafty Scrappy Happy, How To Nest For Less, Tatertots & Jello, The Grant Life, It’s Overflowing, Lolly Jane, Too Much Time, Six Sisters’ Stuff, Positively Splendid, My {Re}purposed Life, Unrefined By Design, Just Us Four, Liz Marie Blog,and The Crafted Sparrow

Monday, September 10, 2012

DIY Painted Foam Mat

[I know I promised I would share this last week, but coming home from the cottage on Tuesday put me a day behind with everything, and I don’t generally post on the weekend . . . perhaps this will be the return of me blogging a bit more consistently]

Rug Horizonal Cropped WM

I have come across several fabulous tutorials for DIYing mats using the interlocking foam squares but I want you to know that you have even more options. You know those foam kitchen mats that are squishy like memory foam but covered in a tacky pattern?

Rug Before

You can take that eye sore – I found mine for under $10 at Costco – and doctor it with latex paint in whatever colour and pattern that your heart desires.

The power of paint strikes again!

How To Transform Your Foam Mat

The key to success? Primer.

Since the foam is porous, it really soaks up a lot of paint. I was running very low on Zinsser primer so I was only able to do 2 coats but I know what a difference even just two coats made to the process.

Keep painting it with primer until you can no longer see the original design on the mat. Make sure you look at it from multiple angles – even when it looked covered, I could still see the raised edges of the design.

I used a roller to apply my primer, alternating the direction with each coat. Once I ran out of primer, I used a tester of what I thought would be my base colour to paint several more coats.

Too light.

Next, I switched to the green paint tester that I used to transform my wooden boxes.

Painted Wooden Boxes 1

My thinking was that the green storage cubes in my Martha Stewart storage bench were the colour closest to the floor so the mat should have this colour running through it as well.

Kitchen Bench WM

It was the perfect choice!

I painted several coats of green as well as around the edges of the mat and it looked a million times better just as a blank canvas.

With the olive oil bottles officially banished, I had to decide on a pattern.

Easier said than done.

I looked at MANY rugs on Pinterest and eventually came to the realization that I didn’t want to have to measure anything or use a stencil.

The solution? Random stripes.

Kitchen Rug Supplies

I remembered reading about Scotch Blue Delicate Surfaces Tape on House of Smiths and decided to try it for my first time painting stripes. The lighter adhesive was perfect for creating stripes without waiting forever for the green to dry.

Once the base colour was dry to the touch I laid out my stripes and then labelled the tape with the colour I would use for each section.

I used a foam brush, alternating green (no painting required), teal, and a custom mix of teal and sea foam blue. Two coats and it was time for the big reveal.

The tape peeled off without any damage to the paint. I removed it while the paint was still wet. I have since used it for a few Silhouette projects as an alternative to transfer tape and officially love it!

After leaving it to dry for the afternoon, the last step was to spray the mat with several coats of acrylic protectant since it would be used in front of the sink. Again, I used what I had on hand – Krylon’s Crystal Clear.

I am able to wipe the mat without worrying about the paint finish. I have scrubbed it a few times without any cracking or discolouration.

Rug Vertical WM

It wasn’t until I loaded the dishwasher that I discovered there may have been a subliminal influence on my colour choices. The design on my dishwasher tab storage container is almost an identical colour palette.

Kitchen Rug Inspiration Colours

This mat was the missing piece in our kitchen decor.

Now we I finally have something comfortable to stand on while doing dishes that does not swallow everything that falls on the floor. Lesson learned with a cheap shag carpet.

It ties the colour scheme together and adds a pop of fun to our tired cabinets and flooring.

Kitchen Rug After WM

Work with what you’ve got, right?

Thanks for sticking with me during my “hiatus”!  I took lots of photos this weekend so I hope to be back with another project later this week!

Pin It

P.S. Does anyone know what classifies something a mat versus a rug?

P.P.S. Check out a round-up of many of my green and teal kitchen DIY projects here.


I link up at: Serenity Now, I {Heart} Naptime, Under The Table And Dreaming, Nifty Thrifty Things, Simply Klassic Home, Home Stories A to Z, Craftomaniac, Skip To My Lou, Not JUST A Housewife, A Bowl Full Of Lemons, Alderberry Hill, I Should Be Mopping The Floor, A Diamond In The Stuff, Creatively Living, The Winthrop Chronicles, Clean & Scentsible, Oopsey Daisy, Lil’ Luna, Someday Crafts, Live.Laugh.Rowe, The 36th Avenue, aka design, House of Hepworths, 52 Mantels, Thrifty Decorating, Crafty Scrappy Happy, How To Nest For Less, Tatertots & Jello, The Grant Life, It’s Overflowing, Lolly Jane, Too Much Time, Six Sisters’ Stuff, Positively Splendid, My {Re}purposed Life, Unrefined By Design, Just Us Four, Liz Marie Blog,and The Crafted Sparrow

Friday, August 31, 2012

A Little Teaser For The Long Weekend

We’re off to the cottage again for the weekend but, in the meantime (ha!), here’s a little teaser of my newest project for freshening up the kitchen.


Kitchen Rug Collage WM

The best part? I already owned everything I needed for this project . . . except the rug.

I’ll be sharing the details on how to make over your own rug next week!

Have a great {long} weekend and happy back to school on Tuesday to all my Canadian readers!

Pin It

Thursday, August 30, 2012

Faux Zinc Tray Tutorial

In case you missed it, here’s a re-post of my latest ‘Pinspiration’ project that I originally shared on Heather’s blog, Setting for Four.


Faux Zinc Tray Banner WM

I have seen many tutorials on how to make paper mache letters look like zinc, but I was especially intrigued by this post that claimed you could easily create a zinc finish with just two paint colours.

Easy Faux Zinc Letters from House Stuff Works

Source: House Stuff Works via Claire on Pinterest

I’ve tested it out and I’m thrilled to tell you that yes, it really is that simple!

I started with a wooden tray from Goodwill that was just waiting for its next life. I bought it at the same time as this tray that already received a “Cinderella makeover.”

Faux Zinc Tray Before WM

Since the tray was originally green I decided to spray paint it with gray primer before giving it the faux zinc treatment.

Faux Zinc Tray Primer WM

(Looking better already!)

Once the primer dried (one of the good things about our crazy hot weather this summer), I painted the tray with one coat of black acrylic paint.

Faux Zinc Tray Black Paint WM

Then, it was time for the magic!

 Magic Paint WM

With an old paintbrush, I dry-brushed on white pearl paint. FYI: I bought this paint at Michaels with a 40% off coupon but I have also seen it at Walmart.

While painting, I concentrated more paint on the edges and corners and applied the paint in long strokes.

Once I was happy with the coverage, I went back and added more paint in different directions to the center of the tray.

 Faux Zinc Tray 3 WM

Rather than add too much, I decided to stop here and live with it for a while. I can always add more in the future.

Faux Zinc Tray 2 WM

The amount of black paint left showing is completely up to you and how you want your piece to look.

Two steps and two bottles of paint! That’s it!

My finished tray will make a cute home for my smallest tea tin succulent planter . . .

Faux Zinc Tray 4 WM

or a lovely turquoise trio borrowed from my mantel.

Faux Zinc Tray 5 WM

See that ribbed bottle? It’s an upcycled soya sauce bottle! I poured acrylic paint into it and swirled it around until the sides were covered. The streaky finish was a complete fluke and I love it!


Faux Zinc Tray 1 WM

{Black paint + white pearl paint = faux zinc}


Faux Zinc Tray Banner WM

If you liked that, I’d love for you to check out some more of my Pinterest-inspired creations. Here are three more ‘Pinspiration’ projects to get you started!

Tea Tin Planters Banner

Pinspiration Bathroom Artwork WM

Pinspiration Banner Mason Jar WM

Thanks for reading (or, if you already checked this out on Setting For Four and you’re still with me, re-reading!) and have a great day!

Pin It

I link up at: Serenity Now, I {Heart} Naptime, Under The Table And Dreaming, Nifty Thrifty Things, Simply Klassic Home, Home Stories A to Z, Craftomaniac, Skip To My Lou, Not JUST A Housewife, A Bowl Full Of Lemons, Alderberry Hill, I Should Be Mopping The Floor, A Diamond In The Stuff, Creatively Living, The Winthrop Chronicles, Clean & Scentsible, Oopsey Daisy, Lil’ Luna, Someday Crafts, Live.Laugh.Rowe, The 36th Avenue, aka design, House of Hepworths, 52 Mantels, Thrifty Decorating, Crafty Scrappy Happy, How To Nest For Less, Tatertots & Jello, The Grant Life, It’s Overflowing, Lolly Jane, Too Much Time, Six Sisters’ Stuff, Positively Splendid, My {Re}purposed Life, Unrefined By Design, Dragonfly Designs, Just Us Four, Liz Marie Blog, Every Creative Endeavor and The Crafted Sparrow

Tuesday, August 21, 2012

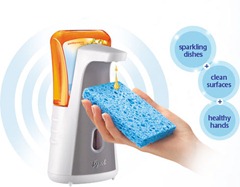
How To Customize A Lysol No-Touch Kitchen Soap Dispenser

Lysol No Touch Square Banner WM

My kitchen has been the target of most of my organizing and tweaking for the last few weeks. The coffee station started the ball rolling and it has felt like a different space ever since.

Over the weekend I decided it was time to make over some of the boring but necessary accessories with spray paint. I painted the paper towel holder and knife block and then spotted my sticking-out-like-a-sore-thumb Lysol No-Touch Kitchen Soap Dispenser.

no-touch-kitchen-1-md

I love it and just used this video to very easily refill it with a different (and much less expensive) dish soap (Lysol is probably not going to like that but I’m in no way affiliated with them!). However, it’s not the prettiest gadget to have beside the sink.

The perfect candidate for my next spray paint makeover!

I’m familiar with the infamous House of Hepworths’ painted soap pump, but I couldn’t find anything related to the Lysol dispenser so this might actually be an original idea!

I turned off the switch so that I could inspect it without getting soaped and then tried to figure how I could paint the unit without affecting the sensor. There is a sensor at the top by the soap nozzle, but I believe the teardrop shaped window on the front does something, too.

I was about to give up when I noticed that the silver face plate was a completely separate piece. It comes right off – no tools required!

Time to customize!

The hardest part was choosing a spray paint colour. 

In the end, the winner was Catalina Mist. It didn’t disappoint!

Lysol No Touch Square WM

Since it was SO easy, here’s the very, very condensed how-to:

Turn off batteries.

Remove face plate, prime, spray paint with chosen colour, replace face plate.

Turn on batteries.

Done!

Lysol No Touch Face Plate Spray Painted WM

Spray Painted Face Plate WM

Lysol No Touch Face Plate Spray Painted Reattach WM

Finished No Touch Dispenser Spray Paint WM

Finished Lysol No Touch 1 WM

Do you have one of these wonderful dispensers in your kitchen?

I really like being able to wash my hands when I’m cooking or baking without contaminating everything else. I had a No-Touch soap dispenser in my classroom when I taught Grade 1 and it was great because it actually made my students WANT to wash their hands!

I’d love to see what colour (or colours) you use to customize yours!

Thanks for checking out my latest project!

Pin It
P.S. Since the hand soap version doesn’t have a removable face plate, there’s no reason why you couldn’t refill the bottle of the kitchen dispenser with hand soap instead and then use this in your bathroom, too!

I link up at:
Serenity Now, I {Heart} Naptime, Under The Table And Dreaming, Nifty Thrifty Things, Simply Klassic Home, Home Stories A to Z, Craftomaniac, Skip To My Lou, Not JUST A Housewife, A Bowl Full Of Lemons, Alderberry Hill, I Should Be Mopping The Floor, A Diamond In The Stuff, Creatively Living, The Winthrop Chronicles, Clean & Scentsible, Oopsey Daisy, Lil’ Luna, Someday Crafts, Live.Laugh.Rowe, The 36th Avenue, aka design, House of Hepworths, 52 Mantels, Thrifty Decorating, Crafty Scrappy Happy, How To Nest For Less, Tatertots & Jello, The Grant Life, It’s Overflowing, Lolly Jane, Too Much Time, Six Sisters’ Stuff, Positively Splendid, My {Re}purposed Life, Unrefined By Design, Dragonfly Designs, Just Us Four, Liz Marie Blog, Every Creative Endeavor and The Crafted Sparrow
Related Posts Plugin for WordPress, Blogger...