Thursday, May 17, 2012

Mother’s Day {or any other occasion} Card

You’ve seen the gifts (click for more details)
Etched Cup Flowers 1 WM

and the recipient, now here’s the final piece – my Mother’s Day card.

Mother's Day Card embellished with flowers and buttons from A Little Something In The Meantime

I had a lot of fun creating this card because it incorporated one of my crafting favourites . . . buttons!

I have SO many buttons in all different colours, but I don’t think that I have ever actually used them on a card.

If I haven’t said it already, double-sided scrapbook paper is a great investment. The colours and patterns already co-ordinate which makes it simple to embellish cards with multiple papers.

For this card design, I chose several double-sided papers from the same pack and cut out a variety of flower shapes and sizes with my Silhouette.

Pieces 1

As usual, I cut lots of extra pieces so that I will be able to make this card again. They now have their own storage case.

Since I’m a perfectionist, I find the initial card takes a really long time to design, but, once I have the pieces, it is always quick and easy to make duplicates.

I also used my white sketch pen to add “Happy Mother’s Day” to the Kraft paper pennant. I have several of these pre-cut with congratulations and birthday sentiments.

Mother's Day Card Pieces WM

To assemble the card, I rounded the bottom corners of the background paper and mounted it on a card base cut from Kraft paper as well.

Some of the flowers have a foam square behind them to add some dimension. Other than that, everything (including the buttons) was attached to the card using my newest tool – a Xyron tape runner.

I bought a kit containing three different Xyron adhesives and refills for $12.99 at HomeSense. I can’t wait to use the sticker maker!

Mother's Day Crop Horizontal

Mother's Day 2 WM

Mother's Day Angled WM

(Gee, can you tell my Mom loves flowers?)

I had a wonderful time creating these handmade gifts for my Mom. Now I need to focus my energy on creating something for my Dad’s birthday (May 30th) AND Father’s Day. He’s always a challenge! I think I’ll be getting some help from Pinterest!

I don’t know about you, but I’m looking forward to the long weekend!

Thanks for stopping by!

Pin It

P.S. My Mother-in-Law is an avid gardener, too! Check out the card I made for her this year here.

Linking up here as well as to these great parties!

Thank you to all the hosts!

Home Stories A2ZWeekend Bloggy Reading

Tuesday, May 15, 2012

DIY Etched Tumblers

Time for part two of my Mother’s Day gift!

Etched Square Banner

My Mom has always had a special glass for her water.  For many years it was a blue glass with a celestial design.  She even bought a back up glass before the store where she bought it went out of business!

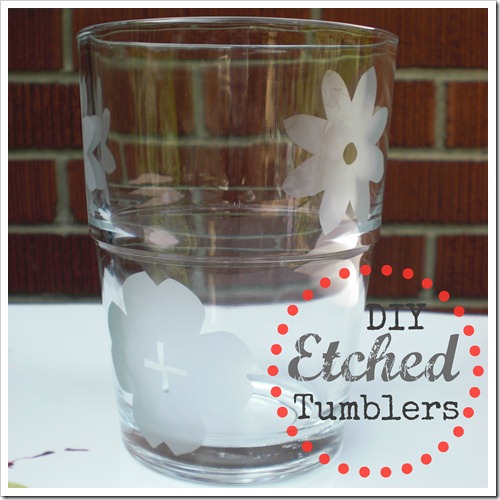
After reading Karianne from Thistlewood Farm’s post about monogrammed glasses (among other things), I decided to make some personalized tumblers for my Mom.

I bought a package of plain glass tumblers from Walmart for $3.00. I made sure to choose a style that was smooth with a lot of surface area for my design. Note: As a precaution, thick glass is better for etching.

I thought about adding a monogram but I decided that I would stick with the flower theme from my first gift (and, as you will see on Friday, my card as well).

I created my design in Silhouette Studio and then cut it out of contact paper. If you don’t have a die cut machine, I have seen this done with everything from punched shapes to reinforcements.

Etched Glasses Screenshot WM

I used the flowers on one tumbler and the H20 shape from my original etching project on the other. For the step-by-step, please check out the tutorial!

After about 20 minutes, I wiped off the etching cream (it’s reusable – more bang for your buck!) and had two etched tumblers. I ran them through the dishwasher and then wrapped them up!

Etched Cup Flowers 1 WM

Etched Glass Flowers 2 WM

Glass Etching H2O 1 WM

Etched Glass H2O 2 WM

Easy!

Dare I say, to quote many of my students, easy peasy?

Etched Square Film WM

If you’re looking for an inexpensive gift idea that can be completely customized, why not give etching a try?

Pin It

P.S. 99 GFC Followers! Oh my goodness!!!  Would you like to make my day and become follower 100?
 
I will be linking up here as well as to these great parties!

Thank you to all the hosts!

Home Stories A2ZWeekend Bloggy Reading

Sunday, May 13, 2012

Upcycled Cutlery Caddy - Recycling At Its Finest!

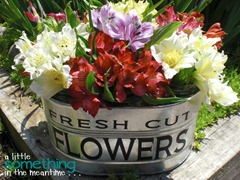
Take one cutlery or beverage/condiment caddy from HomeSense . . .

Cutlery Caddy Before WM

Add 6 recycled glass bottles, 3 vinyl words (I cut mine with my Silhouette) and one Costco bouquet of Alstroemeria.

What do you get?

A fun way to display flowers and, in this case, a lovely Mother’s Day gift!

Fresh Cut Flowers Collage WM


Flowers 1 WM


Flowers 2 WM


Fresh Cut Flowers Before After WM

Can you really go wrong with flowers?


Flowers Square Banner Horizonal WM

Thanks for visiting! I will be sharing the rest of my Mother’s Day gift on Wednesday and Friday.

Pin It
P.S. This is the same font that I used for my distressed sign – Biondi!

I will be linking up here as well as to these great parties!

Thank you to all the hosts!

Home Stories A2ZWeekend Bloggy Reading

Mother’s Day 2012

Happy Mother's Day A Little Something

This year, I get to wish my Mom a Happy Mother’s Day in a way that I never have before – over the internet! 

{Side note: This is a photo of the two of us being silly between shots as we waited for my Dad to take a birthday photo (with his fancy camera . . . which I now envy) back in November. We both celebrate our birthdays in the same week. I gave a framed version of this photo to my Dad for Christmas with “Chris’ Angels” underneath it cut with vinyl using the Charlie’s Angels font.}

Even though I’m 31, my Mom still warns me to be careful when I use a knife.

I love you, Mom! Happy Mother’s Day!


Thursday, May 10, 2012

Fabric Paint Office Chair Makeover - A Cautionary Tale

So, I’m on the fence about this project but I promised myself that I would share both my DIY successes and my failures.

Back when I posted about my own makeover, I alluded to a project that would either be a success or an epic fail. It’s finished and in the end, it falls somewhere in the realm of “it’s alright.”

From far away it looks great, but I cannot say that I would recommend this method to anyone, nor would I do it again.

Fabric Paint Office Chair Makeover WM

This makeover fought me every. step. of. the. way.

Nothing went according to plan.

I bought a $30 chair from Canadian Tire thinking that I could make it look pretty because my current office chair hurts my back. Mr. Mechanic likes to tell me it’s not the chair but the amount of time I spend in the chair now that I’m blogging. He’s probably right.


Office Chair Original Before

When I finally took it out of the box (almost a month later) I realized that I would not be able to cover it with fabric like I had been planning because of the bump on the backrest. I have never done upholstery before and I can’t sew. I was doubtful that fabric would conform to the shape of the chair cushions.

On to Plan B: Fabric paint or, more specifically, Martha Stewart’s Fabric Medium added to black acrylic paint (also Martha Stewart).

MS Paints WM

I had a 40% off Michaels coupon so that this $10 bottle would only be $6.00 + tax, but I got distracted when I was leaving the house and left it at home so I could only use the in-store coupon for 20% off.

I also bought 2 bottles of Beetle Black paint since I already had a bottle at home from my wooden signs and figured this would be enough.

Silly me!

After removing the plastic backing from the seat and backrest, I got ready to paint.

I mixed the paint and fabric medium according to the directions and applied it generously with a foam roller.

The chair fabric was a light gray colour originally and it felt a bit like burlap.

Before Paint Collage WM

Three bottles of black paint later, you could still see the white batting through the fabric in some places.

As an added bonus, the somewhat scratchy fabric had become crunchy. Great.

A few days later I bought another bottle of paint. I figure I spent over $20 on the black paint and fabric medium. Note to self: stock up on black paint when it’s on sale.

Using every last drop from bottle #4, I was able to cover the light spots.

Then, I left it to dry for a really long time.

Partly because I was discouraged and partly because I did not want to sit down and end up with a black bottom!

Finally, it was time to stencil.

I already owned a Martha Stewart stencil and had seen it used for many blog projects. I decided to use two colours – Pollen and Gray Wolf because the accent colour in my office/craft room is yellow and the rug is gray.

Here’s where the “from far away it looks great” comes into play.

Before and After Chair Labels WM

The stencil colours look great together and I love the design BUT the contours of the chair and my decision to use a foam brush to apply the paint made it blotchy in some places and very sparse in others.

Chair Backyard WM

Lesson learned.

Chair Collage

The final chapter of my office chair debacle occurred during the assembly.

I was very proud of myself for putting it together without any help. I took photos of the finished chair and proceeded to bring it inside.

Then, I sat down on it and realized that the seat cushion was backwards. Geez!

Luckily it was a quick fix that made it {slightly} more comfortable.

Inside vs outside chair

The chair is now in my office, but I go back and forth between sitting on it and sitting on the old chair (I may or may not put a plastic bag on the seat).

Yes, it looks pretty but the seat is far from comfortable thanks to the crunchy fabric paint and the bump in the backrest sticks out in just the wrong place.

I will continue to keep my eye out for a stretchy fabric.

However, I might not need to worry about makeover number two since the reviews I read online say that the back of the chair snaps off after a few months!

I’m sure fabric paint is great, just not for this project!

Thanks for reading my cautionary tale :)

Pin It

Linking up here as well as to these great parties!

Thank you to all the hosts!

Home Stories A2ZWeekend Bloggy Reading
 
Related Posts Plugin for WordPress, Blogger...