Monday, April 9, 2012

Spring Mantel . . . Part Two

Last week I said that I would probably tweak my mantel after sharing it and tweak, I did!

Here’s how it looked when I posted last week.

Spring Mantel Full View

I thought the daffodils were a bit tall in relation to the sheet moss banner, but I certainly didn’t anticipate this daffodil problem.

Daffodil Fail

They were just following my instructions, though!

Bloom Sign on Mantel WM

Oh well. My daffodil mishap turned out to be a great thing.

It led to a new project and made space for two adorable pots of mini daffodils housed in a pair of $1.99 buckets from HomeSense. As an added bonus, my planter box can sit on the fireplace hearth.

Here is Spring Mantel Version 2.0

Spring Mantel Take 2

My painted bottles and plant did a flip-flop.

Spring Mantel Take Two Left

Spring Mantel Take 2 Front

Spring Mantel 2 Left 2

Spring Mantel Two Right Side

Did you figure out what my sneak preview was?

Sign Sneak Preview

Smartie Pants!

Glenrose Seed Co Sign

A tutorial for my newest sign will be posted later this week. I used a totally new (to me) technique and it was super easy.

Even though they’re not from my mantel, check out these three beauties. I am loving my garden (and bottles as vases) this year!

Tulip in Pop Shoppe Bottle

Daffodil in Vintage Look Bottle

Tulip in Crown Jar

The blush-coloured tulip was the centrepiece for our Easter meal. It found a new home in my Crown jar after a squirrel ripped it out of my porch planter last week. Another happy accident.

One more thing before I go – our delicious Easter dessert, courtesy of Pinterest.

Bird's Nest Dessert

Chocolate chips, peanut butter, butterscotch chips, chow mein noodles and Cadbury mini eggs.

So good.

You will not regret it.

Pin It

Sunday, April 8, 2012

Happy Easter + a Sneak Preview

I should be cleaning, cooking etc. right now, but I wanted to pop in quickly to wish everyone a Happy Easter!  I hope you are enjoying time with your families this holiday weekend.

I haven’t posted much in a few days but that doesn’t mean I have not been creating. My Sister-in-Law was visiting from Wednesday to Saturday and while she was here my Silhouette got quite the workout!

For now, here’s a sneak preview of one of my upcoming posts – Love it!

Sign Sneak Preview

See you next week!

Pin It

Friday, April 6, 2012

My Spring Mantel

There will still be some tweaking, but, since the daffodils and tulips are blooming, here is my Spring mantel.

Spring Mantel Full View

Daffodil

Bloom and Banner

(Taken one day earlier . . . amazing how quickly flowers change!)

Spring Mantel Side Angle

Painted Spring Bottles

Spring Mantel Tilted

My favourites . . .

Banner Formula White

Twine-Wrapped Bottles

Spring Mantel Full View

Have a wonderful holiday weekend!

Pin It

P.S. Find out more about my bloom sign here and my easy sheet moss banner here.

Wednesday, April 4, 2012

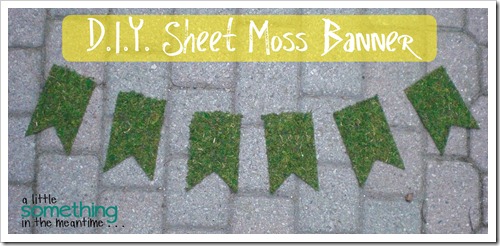
Easy Sheet Moss Banner


Sheet Moss Banner WM
This was so easy thanks to a fabulous invention called adhesive-backed cardstock.

No spray adhesive, very little mess (because I did it outside on the patio). Easy.

Supplies:
One roll of sheet moss from Walmart, 2 sheets of adhesive-backed cardstock (you could use spray adhesive if you can’t find this), scissors.

The How-To:
I used my Silhouette to cut the same shape template as my any occasion paint chip banner. I was able to fit 6 pennants on one sheet.

Design your pennant shape
Peel off one pennant.

Adhesive-backed cardstock WM
Stick it onto the sheet moss.

Apply cardstock and cut out shape
Cut around the shape.

Sheet Moss Pennant WM
Repeat until you have enough for your banner.

Sheet Moss Banner 3 Pieces

Sheet Moss Banner 4 Pieces WM

Sheet Moss Banner No Label
Later today, I will attach it to some twine, hang it up and maybe I can call the mantel finished!

It’s going to look great with my planter box and bloom sign . . .

Bloom Sign on Mantel WM
Pin It
Linking up to these great Link Parties!
Thank you to all the hosts!

Update:  Here's the finished banner!  See more of my Spring mantel here.

Monday, April 2, 2012

The Many Lives of a 30 Cent Sign

On Sunday, I decided to make over a clearance sign that I bought at HomeSense last year.

Bloom Sign Zoom WM

The end result is exactly what I wanted, but it took me two attempts to get there.

Sign Price Tag

Like the title implies, I bought the sign for 30 cents (I actually bought 3 because I knew I couldn’t cut my own for that price).

The original price on the sign was $3.99, so I think I got a pretty good deal. 

What I don’t understand is who they thought would buy this sign.

You Rang

???

Anyway, last year at Winners I bought a wooden planter box with picket fence slats on it.

The colours used to weather the slats are so me.

Weathered Planter

This planter box will be the focal point of my mantel . . .  when I finally finish it, so I wanted to add a little sign to the front of it that incorporated a spring or garden-related word.

I bought two different shape downloads for my Silhouette and also played around with my fonts using the words Grow and Bloom.

I cut stencils from contact paper and got ready to paint (I sanded the design off it earlier in the week).

I painted on a layer of black paint, let it dry and then painted over the word GROW with the same green that I used for my Grocery sign. After peeling off the lettering, I was left with this (sorry for the glare):

Grow Sign WM

I hated it.

I thought I might be able to salvage it by painting over everything with white paint and then distressing it until the black letters showed through.

Grow Sign White Paint

Wrong!

The tip of the g sanded right off.

It looked like it said crow instead of grow.

So, I sanded as much off as I could and started all over again with a completely different approach and word.

Before I had a blog to call my own, I sent a photo to the bloggers at aka Design to thank them for the tutorial that I used to create Christmas presents for my family. Shannon ended up sharing my sign in a reader feature.

Personalized Family Sign

I used the same technique for my second attempt.

For all the details, check our their step-by-step.

Basically, the order was black paint, antique white paint, crackle medium, stencil the word “bloom” in black then sand to distress it.

I was impatient and used a heat gun after each step to speed up the process. Next time, I would wait longer for the crackle medium to dry because the heat gun made it bubble.

Bloom Angled WM

So.

Much.

Better.

Bloom Sign Before and After

To give it an even more aged look, I added black paint to the edges and then wiped and/or sanded most of it off.

Bloom Zoom 2 WM

Now, the 30 cent sign matches the age and character of the weathered wood on my planter box.

Bloom Sign on Mantel WM

If only I could finish decorating my mantel . . .

Pin It

Linking up to these great parties as well as those on my Link Parties page!

Thank you to all the hosts!

Home Stories A2Z
 

Related Posts Plugin for WordPress, Blogger...